I realized the other morning during the second of my two one-hour workouts that I hadn't put on any deodorant.
Then I realized I didn't really need it because despite the fact that I was in a yoga pose that had my nose in fairly close proximity to my underarm, I didn't smell anything.
That set me to thinking.
Deodorant was one of the first crunchy things I made. Before I tossed anything besides my shampoo, I had read a few blogs expressing concern about the effect of antiperspirants on our bodies' ability to expel toxins through sweat. Those writers pondered a possible connection between limiting the effectiveness of our underarm lymph nodes with antiperspirant and the rise in breast cancer, more so in women because we shave and therefore put the chemicals in antiperspirants directly on our skin.
When I decided shampoo free hair was working and my daughter who had spent too much time reading Pinterest suggested "crunchy" was better, I made my first batch of deodorant. It broke me out. I frequently had to go days without using it in an effort to heal, and at the time it was a big deal. I could tell I'd forgotten some important hygiene.
My daughter, who had bought her deodorant off Etsy, said she'd got a batch with Shea butter in it and had the same results. I tossed mine and started over with basically coconut oil, baking soda, tea tree oil, and beeswax as a stabilizer. No more problems with rash and I could go back to my regular use routine.
I continued my crunchy journey and gave up body and face lotions loaded with chemicals for homemade or natural alternatives. Shea and coco butter, beeswax, olive, almond and coconut oils and essential oils for fragrance have replaced all the petroleum-based products and chemicals I once used to battle dry skin. The last time I picked up a commercial product because it was handy, I felt like my hands were smothering and had to wash it off.
When I realized I'd missed Tuesday's deodorant, I couldn't honestly remember the last time I had used it. Although an hour of Zumba and an hour of yoga will make me sweat even in cold weather, I don't notice the odor I used to expect. Could it be that without the toxins put on my body my sweat is no longer a desperate attempt by my skin to save itself?
It was one of those light bulb moments.
Our skin is actually our bodies' largest organ and the chemicals we apply in lotions and cosmetics are quickly absorbed. As long as we see the result we seek we don't generally give it a second thought. Perhaps we should. Maybe just being clean and keeping the chemicals away is enough.
Perhaps the lie we've bought into about cosmetics and beauty products is really part of what's aging us, overloading our systems in ways that cause chronic ailments, and filling our bodies with toxins that kill us.
Perhaps if we go without we will find we are better off in ways we never expected.
Showing posts with label #crunchy. Show all posts
Tuesday, November 18, 2014
Saturday, July 19, 2014
Crunchy Confessions -- Not Everything Works
I have a confession about my move to crunchy.
Well, a few actually.
The big thing is that not everything works, at least initially.
1 - I haven't put away my detergent completely.
The natural alternative doesn't get my super dirty, I've worked in the yard and garden or manhandled things in the kennel shorts clean. And for whatever reason I wasn't sure about using it to clean kennel towels and blankets, used for grooming, bedding and sometimes doggy accidents. But I'm using much less and I may eventually get around to making something more natural, but a bit stronger than the soap nuts. Oh, and I've found that regular detergent tends to not get my kennel clothes clean either -- maybe I need to get less dirty, or just buy new shorts.
I had my husband buy bleach for my laundry from the dog kennel as well because I wanted to be sure it was santitized and didn't smell like doggy business any more. Bleach is bad stuff to add to your water and I know that. Funny thing is, while I was out, I used white vinegar, and the towels smelled amazing. I'm pretty sure I'll be going back to white vinegar for the less nasty loads and, once the bleach is gone, for everything.
2 - My first crunchy deodorant got thrown away.
It was one of the first things I made because I was convinced that antiperspirant wasn't good. I had a problem in that every time I used it, I broke out. I thought it was shaving. Turned out to be the Shea butter. My daughter has been buying natural deodorant off Etsy (an option if you don't want to take the time to make your own) and her newest purchase had Shea butter in it and guess what, she broke out.
I tossed my old stuff and found a recipe without Shea butter, which is apparently wonderful for skin everywhere else.
This one calls for 6-7 Tbsp coconut oil, 25 drops tea tree oil, 2 Tbsp Vitamin E oil, 2 Tbsp baking soda, 2 Tbsp cornstarch or arrowroot powder. I added 2 Tbsp of beeswax because I wanted to make sure my deodorant wasn't a lotion in hot weather. Start out by melting the beeswax. Once it is completely liquified, add the coconut oil and melt it, then add the dry ingredients and mix thoroughly.
This recipe made enough for two deodorant sticks. Unfortunately, I only had one, so back to the the jar, but either way I've got enough to do me for a while and it's working great.
3 - Fleas are tough.
My dogs had made it great with their garlic supplements until about two weeks ago. Then I gave them all baths, which is part of the natural flea control method. Unfortunately, I let them dry in my grooming parlor.
I'm sorry to admit that I occasionally groom dogs with fleas. Many of the fleas fall off with the hair and the rest die in a good bath, but those that fall off with the hair are just waiting for another dog to come along with no protection. Without any spot-on drops, my dogs became those dogs and we've been fighting the flea battle with everything but chemical weaponry since.
The Jack Russells were shaved to improve flea visibility and saturation (it also helps with shedding so it's not their first time). Then they were bathed again and sprayed liberally with the flea repelling lavender spray made by combining 1 teaspoon Apple Cider Vinegar, 3-4 drops lavendar essential oil and the water needed to fill a small spray bottle. I also add about 3-4 drops of tea tree oil to help with healing. It makes the dogs smell fresh, instead of perfumed or chemically, but they still run and hide when they see the bottle.
That wasn't quite doing the trick, so I started looking for something to kill them. I found a natural product on Amazon from Buck Mountain, but it was prohibitively expensive. Then I found a recipe for one on Primally Inspired that was based on the Buck Mountain formula and ordered the ingredients for it from Amazon instead.
Ingredients:
1 cup food grade Diatomaceous Earth (DE)
1/2 cup neem powder
1/2 cup yarrow powder
20 Drops Eucalyptus essential oil (Leave out the essential oil if using for cats.)
I found a 10-lb bag of DE with free shipping for about the same price as a 1-lb bag with prime shipping. I had to wait on it, but DE is also good for dusting garden parasites and dealing with other bugs.
Diatomaceous Earth is a very soft powder made up of fossilized remains of tiny aquatic organisms called diatoms. While it feels soft to us, to insects it is anything but. Under a microscope, DE is very sharp, causing it to puncture the exterior of insects so that they die of dehydration or buggy infections. Food grade DE is harmless to humans and pets and can be taken internally for parasites (if you need to deal with that). I don't have to worry about the babies or dogs eating it.
At the same time, it means it doesn't instantly kill fleas. If I want instant gratification, I need a bottle of alcohol and the flea comb. I use rubbing alcohol, even if not completely safe and natural, as I still eliminate the exposure of pets and children. Comb the fleas out and douse them. They're dead.
Neem powder is made from an herb and is a natural repellent because it interrupts the insect's life cycle. It also has moisturizing properties, which may help heal flea irritated skin.
Yarrow powder is supposed to help sooth the skin. It's also quite expensive with no free shipping options, so I wound up leaving it out.
Eucalyptus is a repellent, but after I made the powder, I could not really smell it.
Making the powder is a matter of combining the ingredients in a glass jar. If you have a shaker top to fit a Mason jar, you're set. I wound up transferring powder as needed to a cheese shaker jar.
It will make your dog's coat look dull and green and to me they smell like henna, very herbal. Death is not instant for the fleas, but there has been a gradual decrease in their numbers and less frantic scratching. My senior JRT, Abi, has a flea allergy, so she's been getting occasional doses of Benedryl to help her cope. Everyone is getting powdered regularly and another bath is looming. I think we'll have the situation eliminated in another few days.
No, it wasn't an instant fix like a good dose of chemicals. But it is safe and natural and I'm pretty sure we'll all survive, although Abi is looking a little worse for wear.
4 - After two batches, I tossed my Vitamin C serum. It wasn't doing anything. At the same time, none of the $20 to $30 commercial products I've been trying seemed to do anything either. I'm washing with olive and castor oil, and following it with plain aloe vera gel. My daughter has been trying some other essential oils, but I haven't got around to it yet.
5 - I also haven't gotten around to making natural housecleaning stuff. My daughter made a batch she shared, and I've discovered baking soda cleans the shower as well as Mr. Clean magic sponges, but I feel like a slacker in that area. I really want to make natural air freshener. On the other hand, I'm not using the chemical kind either, so I guess I'll get around to making my own one day.
And I generally feel like a slacker when it comes to anything to do with cleaning the house anyway, so that's not a big shocker.
6 - I won't go back.
I was rushing around the other evening and thought some hand lotion would feel nice, you know, good old commercial lotion. It didn't. It didn't even smell good any more. My hands felt like they were smothering. I washed them and tossed the container in the trash. I think there are still a few unemptied lotion bottles around, but I don't think I'll be tempted to use them and they'll soon be making the trash run as well. I am about out of my luscious body butter, but I've restocked on ingredients and found another lotion recipe to try, so I'll be cooking some up and sharing it soon.
For me going crunchy has been not only a gradual transition, but a learning experience as well. I'm far enough along to notice the difference quickly and have to catch myself before I look down my nose at anyone still relying on chemicals or eating highly processed foods. I'm glad it's a multigenerational thing and "my" girls are living in a home with fewer chemicals as well.
It's a journey and I don't think there will ever come a time when I think, hey, I know all I need to know to make all I need to make. I'll keep experimenting and losing my recipes and finding new ones.
I'll stay on the crunchy path.
Saturday, June 14, 2014
Growing What You Can Is Part of Being Crunchy
I grew up in the country in the generation between self-sustaining and completely unable to raise food, one of the baby boomers whose world was transformed by corporate farms, mega stores, and eventually the Internet.
Despite the availability of virtually anything a person would want to eat in a wide range of stores, my grandmothers and mother always raised and put back virtually all the vegetables their families consumed in a year's time.
My paternal grandpa slaughtered a steer each fall, dividing it with his family and filling all our freezers with organic, pasture fed angus, long before it was the meat to eat. My paternal grandmother had milk cows and made real butter and cottage cheese and supplied us with the skim milk we drank (our vitamin D was entirely from the sun). Many falls there was also a pig, converted into hams and sausage in Granny's basement.
Ma's garden boasted towering rows of sweet corn where we could hide on hot summer days and there was always a pot of green beans ready to eat at someone's house. She made mashed potatoes with condensed milk and lots of real butter. They didn't have livestock, but I remember how sad she was when she was no longer physically able to put out a garden. She was probably in or near her 80s.
We ate Sunday dinner at Granny's and before we went home she always loaded us down with food. In the summer, that meant a trip to the garden with a knife and a paper sack -- fresh tomatoes, corn, whatever there was to gather. In the winter, it was out to the stone cellar for potatoes, or apples, or even a wilting cabbage.
My childhood memories include organic pest control (picking potato bug and Japanese beetles off of plants and drowning them in pop bottles) and harvest from shelling peas (I still love raw sweet peas) and shelly beans (pintos, kidneys, Octobers), to stringing green beans and gorging on blanched corn cut from the cob for freezing (I wasn't allowed a knife). I was often the third generation on hand, helping out at a grandmother's home where there was real work, or at our house with Ma or Granny on hand to help my mom.
Among all the things both of my grandmothers left when they died, they left food: cans of tomatoes and green beans lining pantry shelves, bags of fruit and cartons of freezer jam packed away in the dark cold of basement freezers. They were still prepared to feed a family, to take care of themselves and their own.
My mom's garden is a treasure to behold. While my grandpas always helped with the garden preparation, our home garden was her work. I do remember my father helping dig potatoes. It must have been extenuating circumstances, because on that instance we children were also on hand, raking the turned potatoes from the ground to be collected, dried and stored. Usually, however, the garden from tilling to harvest was her domain and I remember her wrestling her big monster of a tiller until I was in my teens (which given her early motherhood put her in her 30s).
At that point I had read an article about raised bed gardening and convinced her to change her garden method. Don't be too horrified, but we used chestnut rails, which were still plentiful in the 1970s, to put her garden in beds. Those timbers have long ago been replaced, but her garden is still in beds and her tilling days behind her. Ironically, my soil is still being tilled and enriched although I dream of the time when my small garden plot will also be the easier to maintain beds.
When I first had a home of my own, one of the things I had to have was a garden. I remember the shelf and small chest freezer that I added in my mobile home to put back my own food. Although never on the scale of my grandmothers and mother, it was something I always did until I moved to North Carolina and my yard was too hard, the soil too poor, and my time too limited for a garden.
Part of my life changes in the last five years has included talking one of the neighboring tobacco farmers into plowing a section of my back yard and beginning the difficult task of turning red Carolina clay into something plants will grow in. Lots of composting and tilling involved and it's still a hit or miss thing depending on the weather and whims of the season -- there was nothing to harvest last year but butternut squash, which volunteered and didn't mind the wet summer.
I've been proud this year to see my daughter with her interest in crunchy living erect a small raised bed in the sunny side yard at her home and begin growing a few vegetables. My granddaughters have been fascinated by the process at her house and my own, "helping" with planting and eyeing the growing plants although their enthusiasm for the early crops (radishes and lettuce) has been lacking. E2 especially likes to get her hands in the dirt and may be the most promising future gardener, but we'll see.
I'm sad to realize that my daughter didn't grow up steeped in home gardening like I did because the move to N.C. came at the same time she would have started paying attention to such things. Still I'm glad that she's beginning while I'm still around to advise her on staking peas and thinning carrots, when to harvest radishes and lettuce, not to worry that first blooms don't produce tomatoes and squash. I'm hoping for a good growing season so we can "work up" tomatoes and other foods together and put them back. And I'm aware that not only her generation, but much of my own has already lost all that knowledge that was once part of our heritage and now must be gleaned from books and the Internet.
I want my granddaughters to begin to have those memories of Mommy and Ma working together to save the food they've grown, the magic of pulling a can of red tomatoes off the shelf, a package of yellow corn or green peppers from the freezer, or a potato from a cold bin in the basement, and remembering the plant that it grew on, the labor and love that went into having it as part of a meal.
In our busy world where we've lost the ability to take care of ourselves, from beauty and cleaning products to the food we eat, this is a lesson we need to relearn. Whatever land we have doesn't need to be about zero turn mowers and paying a crew to come in and keep it pretty so we can drive to the store and buy everything we need, because we work all the time and have money for those things. Even if it's just a four by four plot, our land should be growing things that are better for us than the food we can get at a grocer's.
More importantly, our children need to know where food comes from and how it comes to our tables, because we don't know what the future holds and we may not always be a short drive and a good paycheck away from everything we need and want.
Saturday, May 17, 2014
Flashback Crunchies: How Are the Natural Options?
So in preparing for a short break from regular life, I didn't really want to take on a new project this week. Sue me for lazy (although flashback crunchies sounds like some combination of pot and LSD -- flashback munchies -- that could cause you to get fat when you stop using).
Instead, I decided to do an update on how my previous projects are working out, or not.
1. When I determined to become crunchy, I started sharing my journey with my hair, which was my first effort at going natural long before I heard the term. More than a year ago I went no-poo with baking soda, vinegar and water as my main hair washing ingredients (although not all at the same time.) I'm still doing that, although I've discovered the diluted honey I sometimes use as an alternative is called a honey-poo. In addition, I've added a semi-weekly deep conditioning with either coconut oil or olive oil. Those have to be followed with a low-poo as no-poo won't cut it. I made low poo with half liquid castille soup, one quarter distilled water, one quarter aloe vera gel and essential oil for fragrance. You can also add honey, vitamin E, or vitamin C (a ton of recipes on Pinterest). I have to use low poo a time or two after deep conditioning, but otherwise only wash once a week. Still loving it, hair is growing fast and shiney and it feels the best ever. My hair is naturally dry, thick and curly, and does best with little interference.
2. In April I quit using detergent for most of my laundry and went with soap berries or nuts. For the most part I'm still happy with the choice. My water is so hard that I can't wear anything white, yet I've had a couple of white t-shirts that have been laundered multiple times without turning orange. I have also had a few very heavily soiled items (shorts and a sweatshirt from working with dogs/yard) that did not come clean. I may look into developing a stronger natural detergent for the dirtier items, but love the natural berries and the fact that I don't need fabric softener either for everything else. I may just double wash the really dirty things or try to avoid getting so grubby.
3. Ditching my chemical facial routine (read anti-aging) was easier than expected. I'm now cleansing my face with olive oil, (cold pressed, virgin) with a bit of castor oil added. I haven't quite found the right combination, but it's easy to adjust on the fly. Castor oil is supposed to help if your skin is oily, but instead leaves my skin feeling oilier than the olive oil alone. After washing I use the homemade vitamin C serum. That's it. No lotion of any kind. I still use a mineral powder in the morning when I have time, both to even skin tone and for a little sunscreen effect on my face.
4. With fleas beginning to show up I looked for natural solutions to that problem as well and that one took a lot of research due to conflicting information. There's just no way I could justify putting a spot-on pesticide on my dogs and exposing three little people to it on a daily basis, especially when most spot-on treatments were not working last summer. I purchased Bug-Off chewable garlic tablets from Springtime and have been happy for the most part. My house dogs will not eat the chewables, so I break them and administer them daily at half the recommended dosage. Four of my dogs eat them like treats and two require peanut butter. Except for the house dogs, I increased the dosage after finding fleas on one of the eight dogs, and ticks on two dogs, but stayed within the dosage range. I also made lavendar spray -- much better smelling than pesticides -- to use occasionally. As a side benefit, my 13-year-old Jack Russell terrier, who has been plagued with allergies leading her to gnaw herself raw every summer for years, has stopped chewing herself. I'll be sticking with these, even if we later find fleas.
5. The following Saturday, I had cooked up sunscreen. No, I cannot state what its SPF is, although the recipe said somewhere around 20, I doubt it is at all scientific. It is, however, free of parabens and the known carcinogens in so many chemicals, including those used in sunscreen and lotion. I remelted the bars last weekend and poured them into empty deodorant tubes bought for the occasion, and that is all that has been used this spring on the 4,3, and 1 year old. No one has had a sunburn. I made the bars with citronella essential oil, so we also hope they will fight mosquitoes. We'll be taking it to the beach and should be outdoors, even if the forecast is for cooler temperatures.
6. Homemade body butter has got to be one of favorites, even if I don't yet duplicate the texture of a commercial product, heck, even if I never do. Creating my own scent in a luxurious, skin softening product is so easy and fun. Yes, the cocoa butter with vanilla is still my favorite. Yes, it soaks in a bit slow and leaves a short-term, oily sheen to my skin, but I love it and have no intentions of ever going commercial again, even if I am a bit slow to toss all my unused lotions.
7. Of course, spring brings ants and last week I had them, and made a homemade ant killer to take them on. This week I don't have them. It works, it's cheap. What more can I say?
8. Although I hadn't committed to crunchy blogs, my first effort was actually deodorant and realizing that most of what I was using could just as well be stored in the kitchen as the bathroom closet. I'm still not using antiperspirant and using my homemade deodorant. I'll admit, if I always needed to smell cool and clean, it might not do the job, but it isn't bad and it is safe. I'm also still struggling to remember to not use it too soon after shaving and dealing with some sensitive skin issues, but no intentions of going back. If I needed to smell better, I'd make some body spray. Regular use of black soap and water pretty well takes care of that any way.
So, there's a recap of my crunchy, with links back to the original blog and the only specific product I used (nothing from the company for doing so, although I was committed enough to reorder and leave a comment on their page as well). I have some new experiments in the works, and I'm a long way from kicking the chemical habit, but I'm working on it and I encourage you to stop and think about the chemicals you expose yourself and your pets and family to as well.
Not so many generations ago, our ancestors didn't go to the store and buy these things. They grew their food, got a lot of exercise working the land, and made whatever cleaning or body care items they really needed. Better living through technology and chemicals has left us with a growing number of unhealthy habits and both chronic and fatal ailments. I'm not ditching my technology, but anything I can do to turn the tide in other area is worth a little effort.
Labels:
#antkiller,
#bodybutter,
#crunchy,
#DIY,
#econuts,
#fleas,
#natural,
#nopoo
Saturday, May 10, 2014
Homemade Ant Killer Does the Job
Ants.
Along with flies, ticks, mosquitoes and fleas,(and the giant spider that was creeping across the Zumba studio this week), they're the huge downside of warm weather. In fact, they were crawling into my house and along random edges long before I considered it really spring. But if you're trying to go green, what do you do?
I'll admit. I went around the outside of the house with some of that bug barrier spray earlier this year. But guess what? It didn't keep them out. I don't know if they come up through the walls or what, but I still had tiny little ants marching around my house on their eternal search for food and shelter.
In the past, I've purchased a Borax based ant bait called Terro, and it works. It is natural, but not every store carries it and it comes in a really small bottle -- I guess so that if ingested it wouldn't be enough to really poison someone. Still, it does the job.
But what about all those pictures on Facebook and Pinterest citing a homemade ant killer? Does it really work?
Yes.
Monday night a full fledged invasion had begun in my kitchen and I could not determine where they were coming in. There was a steady stream of ants marching up the cabinet near the pantry and across the front of the counter all the way to the kitchen sink. There wasn't really anything to eat along the way. Maybe they were thirsty.
I dug up the recipe for the ant killer on Pinterest.
All I needed was 2 tablespoons of Borax, 1/2 cup of sugar, a cup of warm water and cotton balls. I've seen some different ratios for the ingredients, but this is the one I went with.
I keep Borax for my laundry (it seemed to help with hard water stains before I started using Eco Nuts) and it's pretty inexpensive as well for a big box that lasts forever and has a lot of uses. It is hazardous to ingest, even though it's natural, but the amount used to poison ants is generally not enough to hurt people or larger animals.
I mixed up the ant killer in an old glass jar (it will need to be refrigerated because of the sugar) and soaked a few cotton balls, which I then placed on the edge of the counter where the ants were hiking. Since we don't drink bottled water or soda, I didn't have any small lids to put the cotton balls in as recommended, so I just put the cotton balls down.
I never did see the huge ant party that the Pinterest pictures showed, which frankly was a relief but made me wonder if it was working. My answer came Tuesday morning when there were no ants marching on the counter. All week long when a trail of ants has popped up, I've soaked a cotton ball and placed it on the trail and by the next day -- no ants!
By the end of the week when I started to put this together, it took accidentally leaving part of my breakfast out to attract them.
Because of any potential poisoning risk, I've tried to place the cotton balls out of reach of dogs and children, but seriously, who's going to chew a cotton ball? I had a friend who called last year upset because his dog had eaten the ant bait boxes! The crunchy plastic was entertaining, but there wasn't enough Borax to hurt her.
The cotton balls dried out and I soaked them again, just to be sure, but the ants did not return. After two soakings, they have to be tossed because they are hard.
I still have most of a cup of ant killer in the refrigerator and will quickly put an end to any invasion for the rest of the summer and the total cost is probably way less than a buck.
So if you're looking for a solution to those little annoying ants, I'm vouching for the cheap and easy one. You figure out how to explain the cotton balls around the house.
Saturday, May 3, 2014
Making Body Butter Good Enough To Eat
When I was little, I remember my mom had a stick of cocoa butter for something, maybe to use on sunburns.
It was in a metal tube with a cap on it that pushed up from the bottom, and I don't think she ever got to use it for whatever purpose she had purchased it. She probably gave it to me and I kept it hidden in my doll box where I could take it out and smell it. I was in love with the scent of cocoa butter.
When I began seeing lotions with cocoa butter in them, I thought I would be able to recapture that scent and, through the years, tried a shopping cart full -- all in vain.
Then I went crunchy with my hair, and among the recommended treatments was a deep conditioner made with cocoa butter. Just reading the "recipe" triggered memories of that long ago cylinder of cocoa butter. In this modern age of internet shopping, a pound of cocoa butter was just a few clicks of my mouse away and chunks of the fragrance I remembered were soon in my grasp.
While I love the scent of the conditioner and the fact that even afterwards I have a vaguely beachy (think suntan lotion I guess) smell, more recently I've been in love with the idea of making lotion with cocoa butter that isn't completely swamped by artificial fragrances or so much processing that its natural fragrance was lost.
My first experiment with a body lotion involved a recipe from my favorite crunchy blog which called for 1/2 cup almond or olive oil , 1/4 cup coconut oil, 1/4 cup beeswax, and options, which I added all of were 1 teaspoon Vitamin E oil, 2 tablespoons Shea Butter or Cocoa Butter (I used one of each) and essential oil.
The instructions said to combine all the ingredients in a glass jar in about an inch of water and heat the water until everything melted and stir it together.
With the cocoa butter and a little vanilla essence oil, the concoction wound up smelling good enough to eat. Just like vanilla flavoring enhances chocolate pie, the fragrance did the same for the small amount of cocoa butter.
Unfortunately, the recipe didn't tell me to whip the ingredients before they completely cooled and I wound up with a lotion block. Even after reheating them, the amount of wax in the recipe was too high for the temperatures in my house and I wound up with lotion a bit harder than shortening. I also discovered that when using beeswax, you should melt it completely before adding anything else because I still had little pellets of wax in my "lotion," even after the mixture had been remelted and mixed. Also I hadn't noticed that Shea butter comes in yellow or white, and if you use yellow, everything is really buttery in color, which I've decided isn't my favorite lotion color.
Not, I should say, my finest crunchy moment, but I do still use it -- especially on warmer days when it tends to liquify a bit more. My daughter has made a batch that is more of a cream texture, but I moved on.
Inspired by a commercial Shea butter that I had purchased earlier in the winter, I decided to make my own body butter. I even cleaned out the old container to store it in.
For body butter, the recipe is simpler: 1/2 cup each of Shea butter, cocoa butter, coconut oil and a light oil like almond or olive oil. Melt all together. Add essential oil for fragrance. I also included some vitamin E oil, since I had it any way. Allow to cool, perhaps in refrigerator, for about an hour until it begins to harden, then whip with mixer for 10 minutes.
My first batch I made with a relaxing essential oil blend that includes lavender, marjoram, patchouli, mandarin, geranium and chamomile. I like the scent, but determined I did not use enough. When I made my sunscreen bars last weekend, I whipped up another batch with the vanilla oil, recreating the fragrance of my lotion and blending with the cocoa so well as to rekindle those old memories again.
(The jury is still out on how well the sunscreen works. Both mom and I are using it on the three Es and no one is burned, but the weather hasn't been ideal. E3, I noticed today, is getting a little tan on her lower arms.)
The homemade body butter is not creamy like the store bought solution, but it softens quickly in my hand. It also leaves more oil on my skin initially. All the same, I like the fact that I could pretty much eat it with no ill effects and that I'm not rubbing a potential carcinogen on my skin just to avoid dryness.
I especially enjoy having control of the fragrance and look forward to the next batch, and the next, and further experiments with essential oils to create not just something that smells yummy, but body butter that meets specific needs. One of the bottles I've purchased already came with a guide to choosing the oil to meet the need, and I'm looking forward to trying some of the proposed solutions.
Even if they don't work as claimed, at worst I wind up with a new scent of lotion and healthier, softer skin.
Saturday, April 26, 2014
Making Sunscreen -- Now We've Got To Try It
Our first beach trip in what seems like forever is a little less than a month away, and while I hope by then not to need any sunscreen (hush your mouth doctor), I've got a feeling three blue-eyed little girls, not to mention the work-indoors adults in the group are not going to be that tanned.
As part of my crunchy journey, I've not only become obsessed by how much other people have done, but super concerned about what goes in and on the bodies of the little people.
Once again, the world is our library and I could find plenty of things to concern me about what is in the sunscreen setting around the house. Not the least of which are the multiple parabens found in so many body care products, including sunscreen, as a preservative, which not only have been linked to hormone imbalances but actually found in breast cancers.
Conversely, I can find a number of articles saying that a do it yourself recipe for sunscreen won't get the job done, not because an individual cannot buy the zinc or titanium dioxide to make it, but because you may not mix it properly and cannot really determine its SPF.
Well, I may miss a spot applying sunscreen too, but those same professionals never told me not to use it because of an uneven application. And really, how much SPF do I need at any given time? Does that number mean a lot to me?
The tide of skin cancer is a rising one, despite the fact that most people have had it drummed into their heads to use sunscreen and we no longer see children with the peeling nose I had throughout my childhood -- you know, back in the dark ages before folks worried about sunscreen. It's also rising despite the fact that most people do not get a lot of sun and the fact that a fair number of people are suffering from a Vitamin D deficiency as a result. At the same time, my farm family neighbors, who spend much of the summer outdoors getting browner and browner as they work the land, are not necessarily suffering from skin cancer. They raise and hunt their food and eat a healthy diet, not the fast food and junk most of the rest of the first world thrives on.
Could it be that the sun isn't really to blame as the studies have indicated? Perhaps our crappy diets cause our skin not to process sun in the way it should? Perhaps the sunscreens aren't as great as we'd like to think? Perhaps there's another answer rather than blaming the sun? If only there were a pill for that, but I guess sunscreen is the next best thing -- anything other than taking a closer look at our overall lifestyles.
My favorite crunchy blogger Katie at Wellness Mama subscribes to that idea, citing her own personal experience with avoiding sunburn not by avoiding the sun, but by eating a healthier diet and gradually increasing exposure to the point she could be outside all day in Florida and not burn. Since she claims a fair-skinned heritage (as do I), I'm going to follow some of her advice this year. Besides, I've already had skin cancer and although my doctor preaches against the sun, I not only feel my early burns are more likely to cause it than any I may get now, but also feel better when my skin gets sun, plain and simple. He cannot promise I won't have a recurrence if I avoid the sun, so I do my best not to get burned or fall asleep in a tanning bed and consider that my part. (OK, I've actually not been in a tanning bed since discovering black soap for my bathing and addressing my winter dermititis with a healthier alternative than the UV rays that once stopped my itching.)
Instead of sunscreen she recommends avoiding processed foods, vegetable oils, grains and sugars, and eating lots of healthy saturated fats, foods rich in Omega-3s, leafy greens and tomato paste. She also recommends supplements, including Vitamin D3 (5,000 IU/day - some evidence shows that Vitamin D can have a protective effect against sunburn and skin cancer); 2000 mg Vitamn C, astaxanthin (a potent antioxidant which acts as an internal sunscreen, but not for children), 1/4 cup coconut oil melted in a cup of herbal tea per day - citing that the Medium Chain Fatty Acids and saturated fat are easily utilized by the body for new skin formation and are protective against burning, and Fermented Cod Liver Oil/High Vitamin Butter Oil Blend.
I'll try to make the diet adjustments and after some research added the astaxanthin, which is very reasonably priced and a potent antioxidant, as a supplement (already had vitamin D3 and C), but the Fermented Cod Liver Oil/High Vitamin Butter Oil Blend is really pricey and the one time I tried the coconut oil in tea I thought I would be sick to my stomach. Ugh. While I'm sure the actual oil is best, I may be forced to consider a supplement instead.
Still, even if I can manage my own sun exposure, early season and children will require some sunscreen in the immediate future and on vacation.
So, with the beach trip still weeks away I decided to make sunscreen and use it in a less crucial environment to evaluate it before the beach trip to make my own decision about what to use. Of course, the children's parents will also get to weigh in but perhaps we'll be able to come to a consensus.
After browsing through an assortment of recipes with hard to determine percentages for ingredients, or ingredients I did not have on hand, even after buying zinc oxide, I settled on the recipe for sunscreen bars from Wellness Mama. Having already made lotion and body butter (I'll write about them later), I had ingredients on hand and was ready for my newest crunchy enterprise.
Sunscreen Bar Ingredients:
1 cup coconut oil
1 cup Shea butter (you can also use cocoa butter or mango butter or a mix of all three equal to 1 cup)
1 cup beeswax (if you'd rather have lotion or body butter, leave this out and whip it as it cools)
2 tablespoons (or more) of Zinc Oxide
1 tsp Vitamin E oil to preserve
Optional: a few drops of essential oil for scent (do not use citrus oils as they can increase reaction to sun!)
You'll need to melt the beeswax, oil and butter in a double burner. I use a mason jar in a pot of boiling water and just use the same jar each time I'm concocting something because anything with wax is a little (ok, darn near impossible) to clean.
Having had problems with beeswax not melting as well as I thought before, I started with the beeswax alone. I got the pelleted version (everything came from Amazon) and it takes forever to become a liquid. When I made a lotion in one of my first endeavors, I didn't melt it first and I still encounter little wax pellets when using the stuff.
Once the beeswax was melted, I added the Shea butter and coconut oil. Coconut oil is not what we think of as oil. It melts at 80 degrees or so, but otherwise is more like shortening. When everything was melted and stirred together, I put it into a plastic bowl (my glass bowl was being used for sourdough pizza dough), then added the vitamin E oil and essential oils. I went with some citronella and lemongrass, both of which are bug repellent in the hopes that I can fight sunburn and mosquitoes at the same time.
The final ingredient was the zinc oxide -- not nano sized, which can be absorbed by the skin, but still a risk for breathing. I did not wear a recommended mask, but handled it carefully and didn't raise a dust either. Once it was stirred in the color of the concoction changed to a lighter color, and I put it into used baby food containers to cool. The bars are supposed to be solid below 80 degrees and rub on like a deodorant stick. We'll see.
So now that sunscreen is made, I'm ready for the sun to shine today and give it a test run. Little people will be hanging with me through the morning and the forecast is for sunny skies.
Saturday, April 19, 2014
Dogs Need Crunchier Living, Too
I really thought I'd make sunscreen this week, but we've been back below freezing several nights and it's raining, yet again, so I've not been really inspired.
Instead, I decided to look at my dogs and flea management after a post on my business Facebook page told me quite succinctly that garlic was toxic and the garlic I had just started feeding my canine crew for flea control was going to kill them. "Dogs shouldn't have garlic....it can cause hemolytic anemia. Just a thought."
Wait, what?
I bought this from Springtime, Inc., which sells all natural pet and people products. It wasn't just something I dreamed up.
So I started researching the topic. And yes, that means on the Internet because I have an inherent distrust for the medical profession whether it comes to animals or people.
Why?
Well, because it seems that unless you can find a holistic practitioner, most would rather prescribe a pill for your aching knees than help you develop an exercise program to strengthen your joints and lose weight. Medication and better living through chemicals seems to always be the answer (like using sunscreen every time you go out and taking a vitamin D supplement instead because you're inhibiting your body's ability to produce its own vitamin D.) For years my doctors have nagged me about my high cholesterol and taking medication, even though when I looked at the numbers it seemed they were driven by high good cholesterol and my ratio said I was good. My most recent physician finally noted that and told me I was fine -- I never would take the pills.
When it comes to dogs, once you've looked at the corn-based food most sell as the best alternative for your dog's diet, well it seems a little distrust is in order. If I had the time and resources, my dogs would eat a raw diet instead of me shopping around for foods that actually contain no corn, wheat or soy and are meat based instead of well advertised.
Seriously, the best thing vets typically offer to control fleas is spot on treatments, most of which did not work last summer. I had clients, along with myself, who were spending a fortune on the big brand flea treatments, having to repeat them every two or three weeks, and still battling the little blood suckers.
Not only that, but flea treatments are pesticides, used on your dog's skin, and if you use any spray you'll see it includes the warning to wear gloves and/or wash after use. What about my dog? If it's not safe for me, what makes it safe for her? If I can absorb it and have a toxic reaction, what about her? If it's going to leave enough residue on/in her skin to kill fleas and ticks for a month, what happens to my grandchildren every time they pet her?
Think I'm overreacting? Five years ago the EPA (Environmental Protection Agency) conducted studies about spot on treatments due to the number of cases of adverse reactions in pets. Those ranged from symptoms in skin and gastrointestinal, to nervous system and even death. The summary of the report called for more variations in the weight sizes especially when it comes to smaller dogs, better labeling and more testing, but the last time I bought any product, the weight ranges were pretty large. In fact, I just checked a website and the package for small dogs goes up to 22 pounds, that means a seven pound dog is probably getting three times the dosage he needs -- that's a lot of toxicity if he has any reaction to the ingredients.
So even though I'd already purchased the garlic chewables for my dogs, I did some more research. Yes, there are articles that say that garlic, as a member of the onion family (I already know onion isn't good for my dogs) is toxic. One of the easiest to find is from Veterinary Pet Insurance claims that even a small amount can be toxic to pets and that it is not a holistic remedy. That article uses the information that since garlic is more concentrated than onion and onion is bad, a much smaller amount of garlic is needed for toxicity -- as little as one clove. Onion can, in fact, cause hemolytic anemia, or at the very least a bad upset stomach.
Well, that is concerning. The article went on say even smaller amounts over time would be detrimental. But wait, this article is, once again, linked to veterinary medicine, or more precisely, medicine and chemicals.
I went back to the site where I purchased the chewables, called Bug Off Garlic. The website cited a study in Japan, where holistic medicine is more widely accepted, and which the company had no part in funding. That study dosed study dogs with 1/2 lb (equal to about 78 cloves) per 100 lbs body weight, obviously a force feeding situation, for seven days. Afterwards, microscopic examination of the dogs' blood showed no anemia, and only a small percentage had any damage to red blood cells.
Well, we know too much of anything, even a good thing isn't good, but once again, I didn't completely trust the source because after all, they are selling the product which contains air-dried garlic -- less concentrated not more so.
I quickly found three sites that recommended fresh garlic, in controlled amounts, as a supplement to help with pest control. None offered to sell me any fresh garlic and one Healthy Pets with Dr. Karen Becker does involve a DVM who practices integrated wellness for animals in her care. The other two sites are Dogs Naturally Magazine and Pet Guide. The common thread was that the chemical in garlic is not exactly the same as onion -- well, duh, we don't just substitute one for the other in cooking -- so it was not the same in the dog's body either.
The Healthy Pets site recommended flea combs and regular bathing, and offered additional suggestions:
"Essential oil sprays containing lavender, peppermint, geranium, lemongrass or citronella can be very effective as parasite deterrents. You need to purchase a pre-blended product or work with an animal aromatherapist to make sure you’re using safe oils at the correct concentration as dog and cat doses are different
"Cedar oil is a long-recognized flea eradicator, and products exist that are specially formulated for cats and dogs.
"Natural, food-grade diatomaceous earth helps to remove fleas and ticks from your pet’s body. (External use)
"Fresh garlic can be given to dogs and cats to prevent internal as well as external parasites. Work with your vet to determine a safe amount for your pet’s body weight."
The other two sites recommended dosages that varied somewhat, but agreed to start with 1/2 clove for dogs 10-20 pounds. Both also agreed one clove for 20 pounds and two cloves for more than 40 pounds. One suggested an extra half clove at 30 pounds and a limit of two cloves. The other went to 2.5 cloves at 75 pounds.
All sites agreed fresh is best, and that heat treating destroys the active ingredient, so since the product is air dried I should be fine. Dosage on the chewables, which half of my dogs take as a treat and half require bribery (peanut butter) or downright bullying to take, is 1 pill per 20 pounds, apparently the equivalent of a garlic clove. After my research -- and the fact that when I made food for "The Beagle" for about 18 months while we were dealing with a digestive issue and included garlic in the recipe with no bad side effects -- has me concluding that garlic supplements of the right sort and in the right amount are safe. Sure, I could dig and mash fresh garlic, but right now I don't have time and I'm not sure how I'd persuade any of them to eat it.
However, just in case we need a little extra help with the fleas, I went in search of recipes for flea spray and found a ton of those with various essential oils. Apparently the best essential oil is lavender, which not only repels fleas but will kill them on contact. One of the easiest I found was from We Live In A Flat.
The ingredients needed to make the spray are apple cider vinegar (ACV), lavender or chamomile essential oil and water. Combine 1 teaspoon ACV, 3-4 drops essential oil and the water needed to fill a small spray bottle (mine are six ounce). Combine and shake before use. Store in a cool, dark cabinet. How easy and healthy is that?
Several other recipes called for Tea Tree oil because of its natural antiseptic quality and some of the other flea repelling oils, so my mix (not yet made I'll admit, because I don't have a clean spray bottle, having dedicated all I had to my hair products) will probably contain oils besides lavender. And yes, I plan to get on that because "The Beagle" had a flea prior to this whole garlic debate.
While searching, I also found a sweet guide to making a scented, flea repelling collar from One Good Thing by Jillee. To make a flea collar, mix a flea repelling essential oil such as cinnamon, rosemary, wormwood, clove, peppermint, cedarwood or citronella with 2 tablespoons almond or olive oil (always dilute essential oils) and soak your dog's cloth collar with the mixture. Remove and let dry then place back on your dog. Reapply the mixture when you can no longer smell it, which should take about two weeks.
Oooh, no fleas and sweet smelling, you know I've got to try that as well. So I'm going to shove a garlic treat down my dog's throat -- seriously, she just won't eat them -- and see if I can find a spray bottle, or at the very least soak her collar. I'm declaring war on fleas without breaking out the chemicals. I'll let you know how it goes.
Saturday, April 12, 2014
Tossing the Anti-Aging Creams, Can I Go Crunchy?
When I started thinking about the strange chemicals I used every day that might be doing me as much harm as good, one of the first things that I thought of was my facial routine, especially at bedtime.
Although I washed with black soap or DHC Deep Cleansing Oil, which until I read the list of ingredients (I had to find them on-line) I thought was pretty good, I knew my after-wash night cream had to go.
What the heck is in the "anti-aging" formula anyway? Seriously, there's a lot of chemicals there that I have no idea what they should or might do. The fact that, like my shampoo, I tended to change formulas every time I needed a new jar, if not sooner, gave me a pretty good idea that it wasn't what I needed.
I couldn't just ditch it without an alternative though, so I started searching my favorite crunchy bloggers' sites. Several of them had facial creams, but most added a moisturizer that didn't sound too promising since, although most of my skin is dry, my face is oily. On my very favorite site, Wellness Mama, I found a Vitamin C Serum that sounded promising, mainly because I didn't have to buy a lot of ingredients.
Vitamin C, which we're familiar with as a good internal vitamin, is also good externally as it is supposed to help tighten and brighten the skin, increase collagen production, help the skin heal, and reduce the negative effects of sun exposures. Well, hey, sign me up,
Off to Amazon I went to find vitamin C powder (I wound up with crystals at $16.23 for a lb) and a dark glass bottle with a bubble syringe($5.49). Dissolving 1/2 teaspoon of vitamin C in 1 tablespoon of distilled water (local grocery store for about a buck) was simple, although the crystals were a little hard to dissolve. For dry skin, the recipe recommended only a teaspoon of water and two tablespoons of vegetable glycerin, which I already had, but I didn't use initially.
It felt funny essentially putting water on my face out of a syringe at night, and there was a slight sting from the vitamin C, which is acidic. After using it a few times, I decided a bit of moisturizer might not hurt and added a teaspoon or so of glycerin. Since there are not preservatives, it has a limited shelf life (one that is less than the amount of serum produced) and needs to be stored in the refrigerator, which adds a refreshing twist to the bedtime routine. I finally made myself dump it last week and make new.
Because I had experienced some tightness, I decided I'd go with the more vegetable glycerin based formula. Bad idea. My face felt greasy the next morning, but for someone with dry skin, I can pretty well vouch for it working. Because my investment was so small, I just dumped it out and made a batch of the original formula instead.
While I had the vitamin C out, I also decided to try vitamin C mask that I found on Pinterest, which is the greatest, or the worst, depending on how you look at it. This one came from DIY Beauty Tips and, like Wellness Mama, she has other ideas if you're interested. It was also super simple.
The mask is essentially a concentrated version of the serum with the same ultimate goals. Mix 1 tablespoon of vitamin C with 1/2 tablespoon filtered water and adjust ratios to obtain the right consistency. If your skin is dry, she suggests using pure aloe vera gel instead of water.
Apply to your face and leave it on for 10-15 minutes or until it dries, then remove with a warm wet washcloth. It does sting on application (acidic, remember?). Since I have a crystal form of vitamin C, removing it was almost a mini chemical peel as some of the crystals were still intact and abrasive.
Since I had bentonite clay on hand ($6.92 for a lb.) I have also tried a mask with two teaspoons of vitamin C and one of bentonite clay, which is supposed to draw toxins from the skin, figuring I could get twice the bang for my effort. The vitamin C apparently dissolved better in the wet clay as there was no abrasive sensation and less sting as well.
It's been probably six weeks since I used any commercial moisturizer or anything at all other than mineral powder makeup, which I have yet to research or replace, on my face. Previously prone to breakouts, (even at my age) I think I've had one angry pore. My skin feels good and I've had no qualms about going to bed without a "nighttime skin treatment" although I did cringe a bit when it came time to toss my Garnier BB cream, which I used during the day. For a while I argued that I needed the sunscreen, etc., but decided if I was going to go natural it had to go as well. Instead I've resorted to the mineral powder on the theory that at least it isn't in my skin, just on on it, and does provide some sunscreen as well as a little vanity boost.
While I don't wear other makeup often, I've not managed to naturalize it yet either -- baby steps -- but have pinned enough ideas that I'll get there. I plan on making my facial cleansers next and ditching the chemicals that may be hiding in that step.
My investment has been a little time and very little money compared to the cost of the products I was using. My crunchy experiments continue, the sun is shining, and this morning, at least, life is good.
Saturday, April 5, 2014
Ditching My Laundry Detergent for Berries?
Until my daughter began her crunchy journey, I had never heard of eco nuts as anything other than a possibly derogatory term to refer to people determined to take care of the environment.
Eco Nuts are an alternative to laundry detergent, she told me, and especially good for hard water. Well, according to her research, anyway.
My water is so hard and full of iron it's a wonder it's a liquid at all. So I decided as my detergent ran low to jump in and buy a box when I was making a recent Amazon order (they're available other places, but Amazon has my loyalty and my prime bucks for free shipping). Of course, I wound up buying an alternative brand of the same product from NaturOli Nuts, just based on weight and cost.
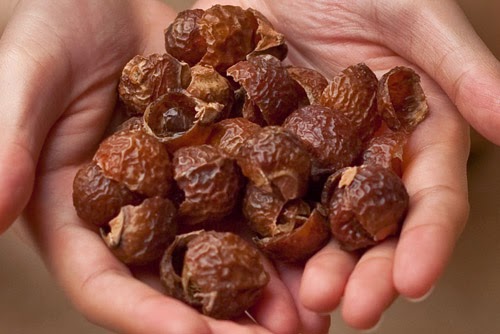
Whatever name they are found under, the soap berries/nuts are saponin-rich, wild-harvested Sapindus Mukorossi berries from the Himalayan mountains of India -- safer for the environment and a natural resource that renews each harvest. Last year, according to one statistic, the Eco Nuts brand replaced about a quarter million plastic bottles of detergent.
But there is more. They are fragrance free, hypoallergenic and contain a natural fabric softener as well, so there is no static in the dryer even without the addition of a dryer sheet.
Sounds too good to be true, right?
Well, after reading the directions and a bunch of reviews, I was willing to risk less than $20 for a one pound box and give it a try.
The dried berries/nuts come in a cloth bag, which contains the whole pound. Directions for use are to place five of the berries in the smaller bag and toss them in the wash. That's it. You reuse the berries about five times, or as some reviewers said, until they were mushy. Take the old berries/nuts out and compost them and replace them with fresh ones.
Still sounds way too easy, but I'm about five loads in and pleased with the results, although I was a bit surprised that the "nuts" were so small and actually hollow. I have not used them for kennel laundry, since it has to be bleached for sanitation and chemicals should not be added to the nuts, and my husband usually does his own clothes, so it takes a while for me to do a lot of laundry. Still, I've washed one load of his clothes, sheets and towels and two loads of my own and can report that the results are as promised.
I've been especially pleased with a white t-shirt that had to be washed before I could wear it due to a strong chemical smell. Typically, that would mean dinginess and perhaps strange stains from the water, but it's been washed twice and is still white. If it lasts, I may even be able to start buying white clothes again!
After my husband's load came out clean -- although since he has uniforms for work, mine may actually be dirtier most days -- I think he's a convert, so our detergent usage is going to go down drastically.
Will the economics be a great savings? Hard to tell until I see how long a box lasts, but I know that it's more environmentally friendly on every front. There is no energy use, pollution or hazardous by-products from production (the harvested nuts are hand sorted after picking), no danger in the water from the washer run-off, and no landfill waste from packaging.
So far, I'd have to say, this has been the easiest crunchy step I've taken. I have to admit that I do miss my Downy fragrance, but I think some line-dried clothing may even beat that if warm weather ever comes to stay.
Saturday, March 29, 2014
Going Crunchy Starting at the Top
I started out what I found later to be a journey to crunchy living by ditching my shampoo a year ago.
I could preface that by saying I've always had a love/hate relationship with my hair. It's thick and curly and was totally not the hair to have in the '70s when I was a teenager and the plethora of conditioners and styling products most curly haired folks use today was unavailable. I remember the thick, unruly mop it was most days and my first shag haircut. I still remember trying to get my locks to wrap around a brush to use a blow dryer for the Farrah Fawcett look -- I also remember the boy who nailed it every day. But that's another story.
Somewhere in my later high school years I despaired of ever getting along with my hair and cut it off -- myself. I watched the stylist cut my mother's hair and began doing it for her. It's a wonder, I guess, that I now groom dogs instead of people but somehow I was never led that way.
Instead for years I regularly cut, colored, and highlighted my own hair and that of my children, neither of whom ever had professional care for their hair while they lived at home. That just makes it somewhat ironic that my daughter's mother-in-law is a master cosmetologist and my granddaughters have always had their hair professionally trimmed.
Sometime in my 40s I stumbled -- one might say literally, since I had fallen and broken my right arm and was in a cast past my elbow -- into professional hair care. I could not wash my own hair and, one step short of going insane, went to a stylist to have whoever was available do it for me. One thing led to another and I had highlights and regular blow drys, consistent professional care not just for the six weeks I was in a cast, but beyond. All that ended when I went in and the man who'd been doing my temperamental hair handled it as though he'd never seen it and I wound up with bad streaks and straw.
After that I tried a few other stylists but not with any regularity and the end of my journalism career, the loss of the easily wasted income and no need to look professional for the folks I encountered every day ended all that.
But professionals aside, I have never finished a bottle of shampoo and gone back to the store for another bottle of the same kind. The same for conditioner. In fact, I seldom finished a bottle of either because they would never quite do what I wanted and some new product would catch my eye. Gels, mousses and other treatments faced the same fate. Nothing made my hair happy for long.
When I began building my Kindle library with free books (I now have hundreds and have paid for very few and may never borrow from a brick and mortar library again) I found a book entitled Hair Gone Wild by Diane Kidman (the link is to the paperback version)free one day and downloaded it. When I started reading, her hair sounded much like my own and I was inspired to ditch my shampoo, conditioner and everything else I used on my hair. I went with natural alternatives I found in her book for everything and loaded up all my products and gave them away.
I went no-poo. Following Kidman's advice, I mix about a tablespoon of baking soda into water in an old conditioner bottle. That's my wash. It's applied to wet hair, worked in and left for about a minute and a half (or while I wash my face in the shower). After it is rinsed out, I follow it with a splash of apple cider vinegar diluted in an old coffee cup. That's it. I'm done.
I'll admit I missed the wonderful fragrances of shampoos and and to a lesser degree the lather (but since I'd already dumped sulfate shampoos there was less of that any way). But my hair became healthier, more manageable, and occasionally even shiny without products.
As time went on, I've added to my repertoire. I have aloe vera gel (the big bottle of pure stuff you might get for a sunburn), which is great for an itchy scalp. Dealing with dry hair early in the winter, I found a recipe for a spray made with aloe vera, glycerine diluted with water,(ratio of 1:1:2) and a few drops of essential oil, that is on hand for times my hair and scalp have just been dry. I also keep a big bear of honey in the shower and often dilute a handful and work it through my hair -- called a honey-poo. Honey dissolves in water and is not sticky in your hair and is also a great facial. A bit of coconut oil in my palm works great on a frizzy day.
My hair's texture is the best it has ever been. It is slick and generally soft to the touch, although it still has a mind of its own as far as what the curls will do on any given day. The post shower hair loss I'd always experienced stopped almost immediately -- you know the big wad that fills up your comb and drain, it's gone. Although it had never worried me because I have so much hair (thanks to genetics from my dad's mother, the Amburns or Burchams one), seeing less hair come out told me it was better for my hair.
Thanks to my daughter and my introduction to crunchy blogs and Pinterest boards, I'm expanding into new products and finding new ways to naturally nourish my hair. I keep baking soda, vinegar and honey in the bathroom and don't expect I'll ever buy shampoo or chemically treat my hair again.
I know her results have been different as she loved her hair with shampoo and products, and not everyone's hair is the same. I had no hair adjustment period as the book warned me, my daughter is still looking for the right mix for her mid-back length hair (but even she's noticed less on her comb and admits regular commercial shampoo isn't the best option).
So if you're never really happy with your hair, considering healthier lifestyle options all around, or wondering what the heck the ingredients in your shampoo may actually be doing to you, consider going crunchy. Look for some resources, free or otherwise, and jump in. You may be glad you did.
Saturday, March 22, 2014
My Bathroom Cabinets Look More Like My Kitchen
Following my daughter down the crunchy path has turned out to be way more expensive and interesting than I ever thought it would be when I threw away my body wash two years ago or ditched my shampoo last winter.
At the same time, I realize that once I buy the start up products that I need for some things, I don't have to buy those commercially produced products any more and have ingredients on hand to last a while, so I'm saving a ton of money long run.
And I'm not putting things I cannot pronounce, let alone understand what they are or what their long-term effect on my health may be, on my body.
I was tempted the other night to use a commercial Shea butter I bought a few weeks ago.
After all, it smelled so good and had been kind to my skin through the time since I bought it. Then I started squinting my eyes to read the tiny ingredients included beyond the Shea butter that my skin needed. Why did I want two kinds of alcohol and what was that other stuff? I scooped the contents of the jar out and dumped them into the trash.
I saved the jar for some homemade Shea butter, of course.
The search for already proven recipes has turned me into a Pinterest addict, but that's another blog. I've also discovered the ground already plowed by pioneers and regularly visit a couple of other blogs for tips and recipes (Wellness Mama and Almost Exactly being my favorites right now).
The fact of the matter is that many of the things I need for my new experiments come straight from the kitchen. Olive oil, baking soda, honey and apple cider vinegar are not only kitchen staples, but regular stars in my bathroom. My husband complained about going to the shower for my honey container the other night and had to buy more. Sorry, I use more honey for conditioning my hair or washing my face than I generally need in the kitchen.
Coconut oil has the same problem although no one but me cares. If I can slip some of that extra healthy fat into a recipe, it's a good thing, but I'm way more likely to use it in the bathroom. So far I'm just putting some of it into a smaller container that I store in the bathroom and keeping the huge jug somewhere else. The gallon jug of vinegar likewise stays in the kitchen, and I refill a small bottle in the bath regularly.
Beyond my basic hair wash (1 tablespoon of baking soda dissolved in an old shampoo bottle of water followed by a splash of vinegar diluted in an old coffee cup for a rinse), my first excursion into DIY natural/crunchy products was deodorant.
Yes, we've all become accustomed to not sweating and having armpits that are gloriously dry, but I've read enough questioning of the ingredients and the basic principal to cast doubt on my use of the handy 48-hour stick. Our bodies are designed to sweat and short-circuiting that process because we don't want to smell bad isn't necessarily a good thing. Plus the ingredients used to do so are by no means "natural" and I've even seen things questioning a link between antiperspirant and breast cancer. So all that said and no science to back it up, I decided to make my own natural deodorant on the grounds of it would definitely not hurt.
The ingredients are 3 T coconut oil, 3 T baking soda, 2 T Shea butter and 2 T arrowroot, along with whatever essential oil a person likes for fragrance. I love lemongrass and already had some on hand, but I had to order Shea butter and arrowroot. (Amazon has absolutely everything)
I followed Wellness Mama's recipe and put the oil and butter in a glass jar which I sat in a pan of water on the stove to heat. The ingredients melt and then you stir in the baking soda and arrowroot and add enough essential oils for the fragrance you want.
My results, however, didn't match hers, which were perfectly shaped little cupcakes or repackaged in old deodorant bar tubes.
Nope, mine was closer to the old Tussy deodorant that I used when I first started feeling the need to make my underarms smell better in middle school.
I guess citing Tussy deodorant, which I'm sure hardly anybody uses any more, although I was surprised to find it is still available and has been since 1925, dates me a bit. It was my mother's deodorant, so what came easiest to hand when I needed it myself. I don't remember ever buying it on my own, but I do recall it being a cream in a small jar that you applied by hand.
While Wellness Mama's recipe indicated I would have rather solid bars, my concoction bled through the cupcake liners and I finally wound up putting the whole recipe into a baby food container. It's not quite solid but would probably work in an old deodorant tube if I waited until it began to reform before pouring it in.
The real question is, does it work? Granted it's only March, so sweaty days are mostly a dream, but I've made it through a few back-to-back PiYo and Zumba classes without feeling like I couldn't raise my arms any more for fear of knocking anyone out. I tossed my commercial products in the trash, and I'm trying to remember my daughter's warning to not apply for at least 10 minutes after shaving (baking soda deodorants can cause a rash, who knew?) but otherwise happy with the result. The initial investment is a bit, but the recipe itself is a breeze and will last a good while. Plus, I'm set up to do it again any time -- if I don't use all my Shea in lotions or the arrowroot in cosmetics (pending experiments).
I'll let you know how it goes.
Saturday, March 15, 2014
Diapers: Going Cloth Isn't Quite What I Expected
My daughter recently announced she was switching to cloth diapers, going on about the lifespan of used diapers in landfills and the horrible impact on the environment. It seems each baby generates about two tons of diapers during his or her disposable diaper days, and those diapers, stored in landfills, are expected to take 250-300 years to decompose.
That's means their old poop is still around long after they, their children, grandchildren, and a lot of generations that won't remember their names have come and gone. Good grief.
At the same time, talk of cloth diapers made me I recall my own cloth diaper days.
Not the days when I wore cloth diapers, God forbid, I cannot remember that long ago, but the days when she was small and I started out my diapering journey with cloth diapers.
Even then, I didn't have to learn to fold diapers correctly, the different patterns to put the most diaper where the most volume was likely to be generated depending on whether you were diapering a boy or girl. My own diapered days were totally basic, washed and hung on a line, folded and stored for use. Not quite the beat with a rock in the river, scrubbed with a washboard, or run through wringers, but still the dark days of diapering convenience.
Nearly 30 years ago when I decided I'd use cloth diapers to be kind to the environment and save money, padded inserts had been added to the cloth so there was something to catch what they produced. There were little plastic pants to wear over the diaper and keep clothes and surroundings dry. Special diaper pins had to be both kept handy and out of baby's reach. I kept a diaper pail with water and borax in the bathroom/laundry room to hold the soiled diapers after they were rinsed in toilet or sink until they were washed. Each morning in addition to clean diapers, I carried a plastic bag to the sitter's so she could rinse and store the used ones. After doing the laundry in the washer, I dried the diapers on the clothesline in the back yard letting sun and wind do the work.
All the same, despite my initial commitment, my cloth diaper days didn't last. At some point it simply became too much work and the disposable ones, despite the fact that I had to nag my husband into hauling them off because we didn't have trash pickup, became more convenient and economical in the "what is my time worth" category. Of course, I was a new mom and soon exhausted by the demands of working in journalism and sleepless nights with the baby who was not eager to give me a break.
I hoped for better luck for that grown baby with her own little one and prepared myself for dealing with cloth diapers.
When E3 arrived with her behind cloth-diapered, I was looking at a totally different creation.
Where are the safety pins, the folds, the plastic panties?
Nope, today's ultra modern cloth diapers are an all in one creation and one size fits all as well, at least by the time they arrive at my house to be put to use. There is, in fact, a diaper liner that is flushable when too soiled or worn for reuse, an absorbent pad that catches the liquid and, most importantly, a two layer diaper cover into which the pad slips, the liner is inserted, and which has an outer layer that resists moisture and either velcroes or snaps to fit the baby.
Okay.
So we've been in cloth diapers for a few weeks now, not exclusively because they still aren't up to the absorbency factor of disposables when it comes to overnight, and because the bulk amount she ordered to get her through a week hasn't arrived yet. I use one disposable at nap time and she uses one overnight. We've still significantly cut our landfill contribution.
It's also much easier to make sure E3 is situated and fitted correctly with the cloth diapers. Maybe it's just me, but three babies later and I'm still finding that I lay the disposable diaper with the front under her butt and have to turn it around because the tabs are going to be unhandy to wrap around her back. Also, the adjustable fitting and elastic around the edges have pretty much eliminated the diaper blowouts for which E3 was well known (I still remember the Friday night fiasco in the playroom and the trail of poop).
Of course, I'm not doing the bulk of the work, just rinsing a little and tucking the diapers in the now zipper closed dry to wet bag, which is pink and white with a moisture resistant liner, that has replaced my old plastic baggies. I can pretty much handle that phase after a few corrections on the proper method for this new diaper generation.
E3 seems happy with the change as, just as E2 could only wear a certain brand without diaper rash, she is now free of the rash that followed consumption of raisins, which she loves. Of course, we've also changed diaper ointments, but that's another story. Diapers, it seems, are just the first step in what has turned into a journey to a greener lifestyle -- what is now termed "crunchy."
So I'm joining the journey and the first to admit that E3's booty does look adorable in a cloth diaper.
Subscribe to:
Posts (Atom)